Google
 

Saturday, September 29, 2007

Tail grafts and necks.....

Today I got to get a good feel for the guitar bodies and the tapping sounds. I flush routed both bodies to clean up the overhang wood from the tops and backs. I then tapped both to see how they sound. There is a huge difference in sound! The parabolic braced box is much tighter sounding with a higher pitched tap tone and a little less sustain in the tap. The scalloped box however is much deeper sounding and it resonates a lot more than the other. Both vibrate when different sounds from the television play, but the scalloped one seems to vibrate much more than the parabolic braced one. With this info, to me it is looking like the scalloped braced guitar will have a much deeper sound, probably more volume, and longer sustain. I really can't wait to string them up and hear them for the first time.

After I had done all the tapping I cared to do, I decided to get to work. First I designed a tail graft that was a little different than the ones I have used on my other guitars. The graft is a bit larger and the curves are different on both ends. I like the design, but I think I will go a little smaller on the next one. These looked smaller off the guitars than they do on. Hopefully the curves on the top will kind of die into the bindings which will make it all tie together. I hope that will make them look a little smaller too.

Once those were done and glued in, I got the second neck rough shaped and ready for the inlays. My plan is to have these guitars ready for finishing no later than the last week of October. I want to get them sprayed and in the curing stages by the first week of November so they will have a good month to cure before final polishing and setup. That will give me just short of a month to have them finished for Christmas. I can't believe I am sitting here in September worrying about having these things done for Christmas!


The two boxes after the tops and backs have been trimmed. Kinda getting that guitar look aren't they!


Here are the bindings after bending. All 8 pieces bent nicely with no cracks or breaks. They are Koa.


One guitar with the heel graft glued and clamped in place.


Here are both necks rough shaped. Unfortunately the volute on the closest one is a lot smaller than I would like it to be. The wood was very hard to chisel out and it wanted to chip and splinter like crazy around the spot where the laminate piece is. I did get a nice 'V', but it is a lot narrower than the other.


Here is a closeup of one of the koa tail grafts. If I feel up to it, I will route out the binding channels tomorrow and maybe get one bound up.

Wednesday, September 26, 2007

Tops signed, one neck carved....

Today was a good day in the shop. I was able to get the tops all finished, signed with a little note to each recipient, and the labels on. I glued the first top to the rims and it is drying int he go bar deck. I did have a bit of difficulty with that little task however. When I notched the kerfed linings I had all three clamps in the body to hold it tightly to the mold. Well when I put the label in and cleaned up the glue squeeze out from the back, I removed the waist clamp. I didn't bother to put it back when I glued to top on. I had set the top on to dry fit it just before I glued it, and since it dropped in place I thought it lined up fine and I didn't give it a second thought. Well that was a mistake. I applied all the glue, set the top on and started to insert the go bars. This is when I realized that the waist clamp being removed had allowed the rim to flex back inwards just enough to keep the braces from lining up perfectly in the notches. Since I have the notches cut tightly there really isn't any room for flex so when I removed the clamp, it knocked the notches out of alignment just a touch. Well it was a mad scramble trying to get the clamp back in, re-apply glue, clean up any runs, and get the top back on before the first glue application started to dry. I got it all done, but I learned a lesson! Make sure that the top and back get glued on in the same way as the rims were when the linings are notched.

Anyways, after that I carved the volutes on the two necks. I think I have mentioned that the sapele necks are very prone to splintering and the wood is very hard. It took quite a while to carve the volutes and I had to sharpen the chisels twice during the process. I got one neck shaped to close to final, and the other neck has the heel carved.


Here is the second back in the go bar deck. I did this yesterday.


Here are the two necks with the heels rough shaped.


Two bodies with the labels ready for tops.


The two tops signed with personal notes to the recipients.


The first box glued up.


One neck is rough shaped and the other neck is still in need of shaping.

Monday, September 24, 2007

Finished top bracing, notched rims, glued one back....

Today I got quite a bit done. I first spent some time finishing the top brace sanding and cleaning up the tops. Then I was able to get the top and back edges of the rims notched to accept the braces that are to be let into the kerfed linings. I used my dremel with a down cut spiral bit and my router base to get them cut. They turned out pretty good. I took my time to make sure the notches were cut the right size so they will look good through the sound hole when the guitars are complete. After that was done I decided it was time to glue the first back to the rims using my go bar deck. It went well and it is drying now.

As promised, here are recordings for the tap tones of these two tops. You will have to forgive the quality as I used my computer and a headset mic to do the recordings. The recordings don't pick up the sustain very well. After the actual sound is around 1 second longer than I could get in the recordings. It also doesn't get the complexity of the tones I hear. It does give you a good idea of what I hear though and it is the best I can do with what I have available right now.

Parabolic tap tone
The 3rd recorded tap is the closest to what I hear. The mic was able to pick up a little more of the sustain.

Scalloped tap tone
The 4th recorded tap is the closest to what I hear. The mic was able to pick up a little more of the sustain.


This is the parabolic top complete. All that is left is for me to sign and number it.


And this is the scalloped top complete. Again, all that is left is the signing and numbering.


This is the top of the neck block where I had to notch in for the A brace.


Just a picture of a couple of kerfed lining notches for the braces. I have sanded the pencil marks off since the picture.


This is what the notch in the top of the neck block looks like. It had to be opened up into the mortise to allow access to the truss rod.


The back all glued up to the rim in the go bar deck.

Sunday, September 23, 2007

Fingerboard slotting and finishing the tops....

I spent yesterday working on the two tops. I first glued up the bridge plate on top #1 (scalloped) and then I went to work carving the parabolic braces on top #2. It took a while to get them all carved and shaped but I think the time spent was worth it as they turned out pretty good. I then glued the bridge plate on top #2, and re-shaped the scallops on top #1 to a cleaner more peaked shape. Once that was done, and the bridge plates were both dry I was able to tap both tops for the first time. I was very surprised at the big differences in the tap tones. Both have a sustaining ring to them, but top #1 (scalloped) has a 'looser' sound to it with a lot of overtones. Top #2 (parabolic) has a higher pitched tone and is 'tighter' sounding. The odd thing is, the loose sounding top is actually stiffer feeling than the tight sounding top. I will make some recordings of the sounds before I glue them to the rims so you can hear what I am hearing. I am debating on whether to take a little more material of of the parabolic braces to try and get it to loosen up a little or not. It is all a huge learning curve here, so I am not sure what to do, or which one sounds better for that matter!

I also thinned the fingerboard blanks and slotted them.


Top #2 with parabolic bracing. This is after carving with a chisel, but no sanding has been done yet.


Top #1 getting the bridge plate glued on.


The fingerboards after slotting.


Top #1 after final shaping of the scallops.


Another angle of top #1

Friday, September 21, 2007

More bracing....

I was able to get the remainder of the top braces glued up yesterday for the first top. Today I took it out of the go bar deck and gave it a tap. I was absolutely amazed at the tone I was getting out of a top that had un-carved braces on it. I got a nice ring, like a bell all over the top with a pretty good sustain. Of course it will change with carving but that was very encouraging. I go the braces all cut for the second top and glued up the X braces and tone bars. Today I glued up the A braces, transverse brace and finger braces. I also cut the two bridge plates which need to be glued on yet.

I then turned my attention to carving the braces on the first top. I decided that the first one will be scalloped with rounded tops and peaks, and the second will be parabolic. With the scallops, I decided to try to be a little systematic in where to put the scallops. I know that the sounds radiate out in circles around the center of the guitar. Those circles have a different diameter based on what note is played. So, instead of randomly cutting scallops where they look right, I decided to mark points on each brace that would put the scallops in a pattern so no two scallops will be in the same circle. I hope that makes sense. Anyways, I used the center of the X braces as a pivot point, then took a string and marked a scallop at the farthest spot out, then shortened the string about 1" and marked the second scallop on a different brace. I did this over and over again until I had every scallop marked on a the braces. I carved them out with a chisel and then sanded them down. I am getting a really nice tap tone which is about the same note as the original tap, but the sustain is much longer, and there are deep overtones. I don't know if this will do anything, but both of these guitars are somewhat experimental so I am interested in seeing how it sounds.

I then drilled out the top of the A brace for the truss rod wrench access by starting with a tiny bit and then upping the bit sizes until I had the size I wanted. I was a little worried about drilling this hole as I was drilling down the center of a mitre joint. I was afraid that the joint would split right down the middle but it didn't. One down, one to go!


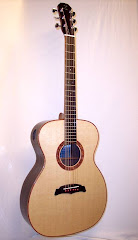
This is the first top (red and bubinga rosette) in the go bar deck with the remainder of the braces glued up.


The first top with the ends of the braces carved down to the top wood.


Here you can see "X"s on the tone bars and cross braces. All of these are in a different circle radius from the center of the X brace. I marked the finger braces after I took this picture.


The braces after rough shaping with a chisel. I know, the scallops mostly look like they line up, but trust me, none of them are the same distance from the X brace center. I measured all of them and recorded the measurements on my plan for future reference.


Here you can see the truss rod access holes. The one through the transverse brace was no big deal, but the one at the top of the A braces was the one that had me worried.


Here is the top braces after being sanded down to 100 grit. I am going to work on the scallop peaks a little to get them a little more 'pointed' but the braces are pretty much to their final shape.


Just another shot of the hole through the a brace intersection. I can see in this picture that I need to clean up the top edges of these braces!


A side shot of the braces.


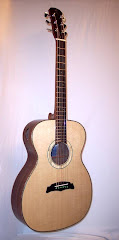
This is the second top (green and spalted maple rosette) in the go bar deck with the last braces being glued up. Neither of the bridge plates are glued in yet. Speaking of bridge plates, I decided not to tuck them under the cross braces this time. There is a lot of discussion in the OLF forums regarding this and I decide to try and keep the contact between the bridge plate and cross braces to a minimum. Again, more experimentation.

Tuesday, September 18, 2007

Top bracing started and some clips....

Today I spent my time getting the first set of top braces ready for glue up and glued the X braces and tone bars down. I will get the A frame, transverse and finger braces glued down tomorrow. I had a big jump in my progression today. I actually remembered to drill the hole through the transverse brace for truss rod adjustment access. Hey, I am starting to learn from my mistakes. You can't fool me 5 times in a row, I'm just too smart for that! lol

Here are a couple of clips of my playing. It is still full of mistakes and dud notes, and my transitions in some parts of these songs is very choppy, but I am seeing some improvement. You would think playing the same song over about a thousand times would be enough for me to have it perfected, but that just isn't how it is going for me. I seem to make the same mistakes over and over again. Oh well, progress is still progress no matter how small it seems. And after all, I'm having fun and that is what it's all about anyway. (Yeah, I know I'm not smiling but really it is fun! I just can't do two things at once so it's either playing or smiling...)


The first top with half the braces glued up in the go bar deck.


This song is called Windows. It is in the fingerstyle book I am using for my lessons. It sounds okay, there are mistakes, and some dead strings but this is the song I am having the most improvement on. I started to learn this song about 2 weeks ago.


This is Canyon Canon that I played in the last video clip. There are still several mistakes, but it is a little better then it was last week. There is one section that I am having a tough time getting my fretting quickly and cleanly. You should easily be able to figure out which part it is. :)

Monday, September 17, 2007

Rosette redux and top bracing.....

Yesterday I sanded the two rosettes flush to the top and took a good look at them. I just wasn't happy with how they looked, and the edges of the wood against the colored strips. The edges of the rosettes just didn't have a good clean edge, even though I sanded them. There were a lot of tiny little gaps that I didn't like. So I decided to re-do them. I routed the colored strips out from around the wood rosettes using my dremel, a down cut bit, and my circle cutter. I adjusted the bit so it cut just inside the colored strips and overlapped the wood just a touch. That way it would remove the colored strips, and trim the edges of the solid wood rosette part. It worked very well. I got nice clean edges on both rosettes and a channel that would accept three strips of colored lines. I re-glued the colored strips in and let them dry. Today I sanded them flat and they look a lot better. I am very happy with the look and now I can continue on. I cut the sound holes out sanded the soundboards down to the almost final thickness so they are currently .100" thick. My goal after final sanding is to have them around .95". I then cut the X-brace intersection on one top. You may recall that I am going to use an 'A' frame support under the fingerboard extension instead of the popsicle brace that I have used on my other guitars. This is supposed to be a much better brace which is stronger and less prone to failure. However, it also entails a fair amount of additional work as the X braces need to be notched to accept the ends of them, the transverse brace needs notches to accept them, and the top needs to be mitred. The neck block also needs to be notched to accept these braces. I got one completed but didn't start on the second one. I will get to that one tomorrow after I get the first one glued up in the go bar deck. You may have noticed that I am not pre-shaping the braces this time either. I want to carve them after they are glued to assist me in my attempts at tap tuning.


The first rosette after re-doing it. The lines are red/black/red.


The other rosette. These stripes are green/black/green. If you look you can see a small nick in the rosette at the top inside just to the right of center. This spalted maple is very fragile stuff and it is a piece that fell out during the routing process. I oriented it so that spot will be under the fingerboard extension.


The A brace.


Here you can see the required notching for this. It is a little tedious but it was also kind of fun.

Saturday, September 15, 2007

Rosettes and pegheads...

Sorry I haven't updated for a couple of days. It has been pretty busy around here. I managed to get the peg heads cut on the two necks, and I also got the rosettes made and glued in. I did have a couple of issues to deal with however. First, when I was shaping the second peg head using my router and a template, I found out that sapele is very splintery wood. The bit wanted to chip the edges of the peg head like crazy as I was cutting it. I was able to go slowly and carefully however just as I was finishing up, the bit caught the corner of one of the top cutouts and chipped a fairly large chunk out of the edge. The piece flew across the shop and I had no luck finding it. So, I ended up having to reshape the top of one peg head to accommodate the chip. I wasn't too happy with it, but there really isn't much I can do about it. Stuff happens. Today when I was thickness sanding my tops, one top had a hidden knot right in the middle of the board. Fortunately both sides were nice so I will just use the good side, and put the knot inside. If this had been an expensive top however, I would not have been very happy about it. I have both tops sanded down to .115" and once I have the rosettes sanded flush, I will take them down to .105". My rosettes turned out fairly nice. One is spalted maple with a black and green trim around both the inside and outside, and the other is curly bubinga with black and red trim. Both pieces of wood are very nice looking but they were pretty difficult to cut. I sanded the maple one flush with the top and the edges have some gaps because of the rough edges I got. I sanded them, but the maple in particular has a lot of gaps and pores which gives the edges a rough look. I am not sure if I want to attempt to re-route around the edges to try and clean them up or not. I will sleep on it before deciding what to do.


The two peg heads. The one on the left is the one that had a chip blow out. I ended up sanding the edges and rounding the top a bit to fix the problem. They look close but they are different.


The two tops after thickness sanding. You can see the dark spot in the middle of the right top. That is a knot that was hidden until I sanded into it.


A close up of the knot.


Here is the spalted maple rosette.


Here is the curly bubinga rosette. The curl doesn't show very well in pictures, but it really has a very deep 3D appearance in person. Oh, that is a pencil line down the center of the top, not the joint line.

Tuesday, September 11, 2007

Neck tenoning....

Well the neck disaster seems to have been diverted. I glued in the laminate piece of mahogany the day the router tore up the neck, and yesterday I unclamped and checked it. The neck seems to be as stiff as it was previously. I planed and sanded it all flat and it looks okay. I went ahead and re-routed the truss rod channel (after checking the collett again!) I glued the heel blocks to the necks and let them dry. Today I planed the blocks to get them flush to the necks. I layed out the tenons and cut them on my table saw using my tenoning jig. After that, I realized that I forgot to install the brass inserts before cutting the tenons. I like to do the inserts first because the sides of the tenon want to bulge out if I do the inserts after the tenons are cut. Not a big deal though, I just clamped pieces of wood on three sides of the tenon to act as a support, then drilled the holes and epoxied the inserts in. It went fine and there were no blow-outs in the tenons.


The neck laminate after I removed the clamps. I think it will look fine under finish after it is stained.


Both necks with the truss rods.


The heel blocks glued and clamped.


The tenons are all marked and ready to be cut. Those spots on the top of the neck to the left are clamp marks. The rubber pads on the clamps cause these marks. I wasn't concerned as this will be under the fingerboard so I didn't use any cauls.


The tenons all cut. Notice anything missing? Yep, no inserts.


Here are the inserts all epoxied in. Here you can see the cauls I clamped on the tenon to keep the sides from blowing out. I had to do this on my 000 as I forgot to do the inserts on it too. I guess I need to write a chart of what gets done in what order so I don't miss things like this.

Sunday, September 9, 2007

Awwww @!#$%$(* !!!!!

Okay, I don't swear but today I really felt like it! Instead I will use the cartoon method of expressing myself!

Stupid stinking rotten lousy router! I decided to go up to the shop and route the truss rod channels in the necks. Easy enough you say right..... well it is an easy job. First I layed out the center lines on the necks, installed the bit in my router, set the height and ran the first blank. At the end of the cut I started to back it out like I have done other times when it started to wander. I thought that was strange so I shut the router off and lifted the neck. That is when I realized the stinking collet loosened up and allowed the bit to rise causing the peg head end of the slot to be way too deep. At first I just figured I would fill it and re-route but then I realized that the depth of the channel is now deeper than the thickness of the final neck. Crud! Anyone need a hockey stick piece of expensive scrap wood? I did get the other neck routed as I did it before realizing that the first neck was trash. If I had figured that beforehand, I would have turned off the lights and went back in the house. As it was, that is exactly what I did after cutting the second slot (which went fine). This is the second time that I have had the bit do this in my router. The last time was on the back binding on my 000. The maddening thing is, I cleaned the collet out from dust this time when I put the bit in and made sure it was very tight. I don't know if I will keep this router or not. I can't have this thing doing this and I don't want to always be questioning if the bit will slide up the collet every time I use it.

Needless to say, this was a lousy day in the shop. I'm off to the LMI site to order another blank.

Update: Of course, as my luck would have it LMI is out of stock with these blanks. I guess I won't be buying any lottery tickets today!


Both neck blanks side by side. The one on the right is fine, the one on the left is ruined.


Here you can see the last couple of inches where the bit rose up around 10mm.


The depth of the slot at the nut end. It is about 22mm deep.


Here you can see the overall depth of the slot compared to the neck thickness.

Update #2. Okay, now that I have cooled off and took some time to thing about my options, I decided to try and laminate a piece of mahogany in the center of the blank from peg head to the heel. I figured that since the neck was ruined anyway, it wouldn't do any damage to try. I ripped two slots through the neck, one on either side of the ruined truss rod slot. I then chiseled out the piece and squared up the end. I ripped a piece of mahogany to snugly fit the slot, glued it up and clamped the entire neck tightly. Tomorrow I will plane both sides flat and then try the truss rod again. I am pretty sure the strength will be fine as other builders make laminated necks all the time. The only difference is that they do the gluing as 3 separate pieces instead of trying to glue a piece in a slot. It should look okay as I am planning on staining them anyways. They only part that might look a little odd is that I am not going to laminate the heel block so the strip will only be in the neck itself. It will also stop at the peg head. Hopefully I will be able to stain it so it doesn't look to out of place. I did order a couple more neck blanks anyway so I have them for future builds. LMI shows them out of stock until tomorrow so I am guessing they will ship sometime this week.