No pictures tonight as the only thing I did was a lot of sanding and I am guessing that pictures of saw-dust would be pretty boring. The main thing I wanted to mention is a really cool thing I found yesterday while working on the SJ. I sanded the body to 220 grit and did some tapping on the soundboard to try and figure out how it would sound. As I was tapping, I got to thinking what note was it making while I tapped it? I grabbed my dreadnought and set it down on the table next to me then I tapped the SJ and started plucking strings on the Dreadnought. It only took me a few seconds to realize the tap tone was a good solid "A" note dead on with an open "A" plucked on the Dread. That wasn't the interesting part though, I noticed that when I plucked the A string, the SJ body would vibrate. It was really weird! I went up and down the dreadnought plucking all of the strings one at a time and nothing would happen with the SJ body until I hit the A string. Then the SJ would just vibrate like crazy. It actually felt like the string was being plucked lightly on the SJ. I guess that is what the natural resonance of this particular group of woods put together is. I found it to be fascinating! I noticed that with my 000 and the SJ, during the build the body would vibrate at different times to the sounds of the radio or TV running in the background. I didn't have that happen with either the OM or the Dreadnought as I was building them. I guess both of those were more heavily braced to allow for that to happen. The 000 really resonates with the radio or TV even now with it being finished and under string tension. I can hold it clean across the shop and if I put my ear to the sound hole it actually amplifies the sound of the TV a little bit. The SJ is doing the same thing. Since the 000 turned out to be such a great sounding guitar, I am hoping that is might be a pre-cursor as to what the SJ will sound like!
I have started ordering pieces for the next double build. I am sourcing my materials from different suppliers this time, and am being much more price conscious than I have been in the past. I want to see if I can build two great sounding and looking guitars using lower grade woods instead of the AAA stuff I have been buying. I am also ordering EIR opportunity grade back and side sets from Allied to see how they are. The prices are too good to pass up and I will get a spare set for my stash. A lot of guys over at the OLF have used it and they love it for the price and quality. I figure for the price I will give it a shot. My goal is to get both of these guitars built for under $250 each total.
I placed an order from Target Coatings for a gallon of USL. This is the same lacquer that Stewmac sells under their private label at a significant price savings. The SJ should be ready for finish in the next week depending on how busy I am at work.
Saturday, August 11, 2007
Wednesday, August 8, 2007
Frets and fingerboards.....
Wow it's hot! I mean HOT and humid around here. My shop is over 100 degrees and the humidity outside is hovering around 100%. That makes for one uncomfortable sticky day. Needless to say, I didn't spend a lot of time in the shop as my little AC unit could barely blow cold air on me, let alone cool the shop off. I took the clamp off of the heel cap and sanded it to the shape of the heel end then bolted the neck to the guitar to see how it looks with the back inlay. It looks pretty cool! I wish I had a way to get the pink wood where the maple binding runs through it, but there isn't much I can do about that. I also wish I would have turned the piece on the neck 90 degrees so the curling was going in the same direction as the inlay. I was looking more at the color and didn't realize the curling was going in different directions when I glued it up. Oh well, something to note for the next build.
After a lot of thought, I decided to go ahead and install the frets now instead of later. My main reason behind that decision is that I am just not comfortable with the idea of hammering in frets on a finished guitar neck and top. I don't have a nice stable jig to hold everything secure to do it properly so I think the safest method is to do it the same way I have done my other guitars. So, I installed the frets and was just about to glue the fingerboard to the neck when I realized I forgot to install the side markers. So, off the the drill press I went to drill the holes and glue in the abalone dots. I had one small error where the drill bit skated to the edge and elongated the hole but I think I can fix that with some dust and glue. Once that was done, I installed the truss rod, clamped the neck to my worktable and put pressure on it to create a little bit of a relief bow. That is to counteract the back bow that fretting the fingerboard creates in the ebony. I always hate doing this part. Every time I do it, I am afraid that I am going to crack the neck. I guess they are probably a lot stronger than I think, but it just seems like an awful lot of pressure on the headstock to neck joint! Anyways, I glued the fretboard down and then wrapped it down with a big rubber band to clamp it in place.

This is the heel cap and back inlay together. I think it looks pretty nice. I just wish the binding was the same pink color as the box elder where it goes through the center. Hmmmm, I wonder if there is something I can do about that.......

The fingerboard fretted to the 14th fret. I wetted the fingerboard slots before installation as has been recommended on several forums. It is supposed to make the fret installation easier. I'm not sure it made any difference.

The side markers installed. If you blow up the picture, you can see the one on the right is the one that the bit wandered.

The neck clamped down and under pressure. I really hate doing this! I cringe when I am putting the pressure on it for the first time.

Here you can see the neck relief and the fingerboard back bow. Okay, you can also see my little shameful secret in this picture. That's right, I can't remember which string is which note so I have a cheat sheet written on the side of my bench tray. Yeah, pretty lame, I'll admit. It must be some kind of mental block. I played the trumpet in school for 7 years, and I never was able to remember notes nor could I tell you what note someone was playing. I could read and play the music, but ask me to write what note each one was on the paper and I got a solid 'F'! Since learning the guitar, I can assure you, my lack of skill in this area is as strong as ever!

The neck all glued up and clamped up.
Monday, August 6, 2007
Neck fitting
Today I had some free time to work on the SJ so I decided to tackle the most dreaded part of guitar building for a lot of amateur builders, the neck set. I have been fortunate as the last 3 builds really have had fairly easy neck sets. Even the dovetail on my Dreadnought was relatively easy. Don't get me wrong, they all needed work, and they all needed adjustments but I didn't find them to be overly difficult, just tedious. This time was different. When I bolted the neck in to get an idea of what needed done I found that my straight edge was just 1/16" over the top at the bridge location, and the straight edge was almost 1/2" to one side of center at the tail. That is a huge amount! My first line of attack was to get a fairly good heel to side fit so I could get a stable starting point to work out the two adjustments that needed done. Once I had a decent joint I started 'flossing' one side of the joint until I got the left to right angle correct. Once that was done, I chiseled out a tiny bit of the heel end of the joint to start tipping the neck back so the angle would raise at the bridge. I went very slowly and carefully removing a little, fitting, measuring, and repeating. The entire time I tried to keep a straight line from the top edge of the neck sides to the heel end so the entire neck tipped back without a rocking motion in the center. If I just removed wood at the heel side, there would be a 'hump' in the middle of the joint which would ruin my joint fit. I spent around 3 1/2 hours working the joint until I finally got it right. The actual joint still needs a little fine tuning but it is almost done. As far as the angle and left/right measurements, it is good. My straight edge just touches the top of the bridge with the un-fretted fingerboard, and the center line is within 1/16" of the actual center of the guitar tail. I could try and get that last little bit but I am afraid that I could mess up the joint and have to start over again. The important part is that the point on the end of the fingerboard lines up dead on with the center joint of the top. That is what anyone looking at it will see.
After that was done, I dug in my scrap box to see if I had any more box elder to use as a heel cap. I just happened to have a piece about 1" square of the pink swirly stuff so I glued that to the heel and called it a day.
I was looking at the overall guitar design, and I have to say I am really happy with it. I put a lot of thought into each element of it trying to get an overall design that ties together. People might think the pink inlays on the back and heel are kind of an odd choice, but they tie into the rosette and that was the plan. I wanted the top to have a somewhat 'formal' look to it, with a little bit of whimsy which is what the pink rosette adds, and I wanted the back and sides to have a wild look which is what the camatillo does. The pink parts on the back add the same whimsy as the rosette, and it ties the top and back together. All in all I think it works.
I have been working on putting together the materials for my next build(s). I am planning on doing a double build which will be Christmas gifts. I am still up in the air as to whether or not to make 'twin' guitars, or if I want to make two totally different guitars. One part of me wants to do two identical guitars with different bracing patterns to see the differences, and the other part of me wants to make the gifts different. Either way, they will both be built using 'opportunity grade' EIR back and sides, Adi tops, and Koa bindings. I am probably going to do one piece necks too. I am trying to keep the cost down as much as possible which is why I am using the lower grade EIR and one piece necks, but also I want to spend the money where it counts, the top. I chose the bindings simply because I love the look of Koa bindings and I have never used it. My plan is to get the parts ordered in the next week or two so I can get started towards the end of August. It's hard to believe, but Christmas is coming fast and I need to get going on these if I want them to be done in time. I would like to have them curing in the finish room by mid October. I will lose almost a month of work time because of hunting season during late November-mid December. I have to account for this in my build schedule. I am really excited about these builds, it should be a lot of fun! If all goes well, that will mean that I will have built 5 complete guitars this year, 4 of them being scratch builds. Who would have thunk it!

Here you can see the straight edge and the center line. Unfortunately, my maple joint is not dead center on the center line as you can see the pencil mark is the actual center joint of the top. I got it close but not dead on. One day I will get these joints right!

The straight edge sitting ont he fretboard just touching the top of the bridge. I am going to make my own bridge, but I have a pre-made one to use for these measurements.

One side of the neck joint.

And the other side of the neck joint. In this picture you can really see the flaw in the heel block that was hidden until I carved the neck. I really wish these weren't here but I am way too far into the neck now to start over again! The neck is getting stained anyways so it should hide.

The heel cap glued and clamped in place.
Sunday, August 5, 2007
Fingerboard sanding......
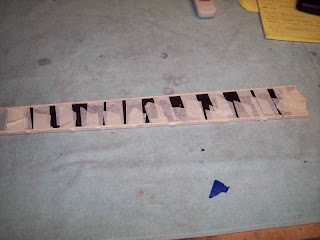
Yesterday I didn't get much time in the shop but I did get enough time to bind the fingerboard in curly maple. I cut the end of the fingerboard to a curved point using my band saw and drill press with a sanding drum. I then took some maple and bent two small curves over a hot pipe using my heating blanket as a heat source. (I ran out of propane in my torch!) I cut the miteres and glued the pieces to the fingerboard and taped them in place to dry.
Today I removed all the tape and inspected my work. The bindings looked pretty nice and my miters were pretty nice. It is hard to cut a good miter on a curved piece of wood! I sanded the binding flush with the top and back of the fingerboard and then checked the fingerboard to see how level it was. It had a fairly good sized hump in the center which tapered down to the ends. I took some time with a level with sand paper on the edge try and get it level. It is pretty good now and is ready for frets. I am still on the fence on if I will install the frets before gluing the fingerboard to the neck, or wait until after the neck is on the guitar so I can get it perfectly leveled out before fretting. I like that idea because I can keep from removing much fret material during the setup, but I am a bit nervous about tapping frets in on a finished guitar. I am kicking both thoughts back and forth.
I drilled out the neck block for the bolts and truss rod access and temporarily bolted the neck to the guitar to check the angle. The fit is okay but it needs a lot of work. The neck is dead on from left to right, but it is angled down so the straight edge is only about 1/4" above the top at the bridge location. It will need some adjustment, but it won't be too bad.
This morning I was looking out my front window and there at the corner of my barn were two nice looking whitetail bucks with their antlers still in velvet. They hung around the barn for a little bit before walking into the woods across the road. What a site to see first thing in the morning!

Here are the two visitors to my barn this morning. If you click the picture you will get a better view. One is a 6 point and one is an 8 point buck.
The fingerboard as of last night. All of the binding glued and taped up.

The fingerboard after the tape was removed.

This is the end after some sanding. The miteres turned out okay.

Here she is for her first poser picture. It looks like a real guitar!

The back

Here is the heel point. I need to cut the heel down to allow for the heel piece thickness. I have curly maple for it, but I am strongly thinking that I will go with box elder to match the pointed piece just below it. I think it will look pretty nice. I need to look to see if I have enough of the pink stuff left though.
Today I removed all the tape and inspected my work. The bindings looked pretty nice and my miters were pretty nice. It is hard to cut a good miter on a curved piece of wood! I sanded the binding flush with the top and back of the fingerboard and then checked the fingerboard to see how level it was. It had a fairly good sized hump in the center which tapered down to the ends. I took some time with a level with sand paper on the edge try and get it level. It is pretty good now and is ready for frets. I am still on the fence on if I will install the frets before gluing the fingerboard to the neck, or wait until after the neck is on the guitar so I can get it perfectly leveled out before fretting. I like that idea because I can keep from removing much fret material during the setup, but I am a bit nervous about tapping frets in on a finished guitar. I am kicking both thoughts back and forth.
I drilled out the neck block for the bolts and truss rod access and temporarily bolted the neck to the guitar to check the angle. The fit is okay but it needs a lot of work. The neck is dead on from left to right, but it is angled down so the straight edge is only about 1/4" above the top at the bridge location. It will need some adjustment, but it won't be too bad.
This morning I was looking out my front window and there at the corner of my barn were two nice looking whitetail bucks with their antlers still in velvet. They hung around the barn for a little bit before walking into the woods across the road. What a site to see first thing in the morning!

Here are the two visitors to my barn this morning. If you click the picture you will get a better view. One is a 6 point and one is an 8 point buck.

The fingerboard as of last night. All of the binding glued and taped up.

The fingerboard after the tape was removed.

This is the end after some sanding. The miteres turned out okay.

Here she is for her first poser picture. It looks like a real guitar!

The back

Here is the heel point. I need to cut the heel down to allow for the heel piece thickness. I have curly maple for it, but I am strongly thinking that I will go with box elder to match the pointed piece just below it. I think it will look pretty nice. I need to look to see if I have enough of the pink stuff left though.
Friday, August 3, 2007
Peghead work and back binding
Yesterday I only had about an hour of free time to work on the SJ so I spent that time getting the back binding glued up and taped. I didn't get any pictures as I was in a hurry. Today I took the tape off to look at the binding job and I was very happy with the outcome. I scraped and did some sanding to check for gaps, and there were none. This is the first guitar that I had no gaps in the bindings at all. I still have a bit of sanding to do to get all the glue off but it looks pretty nice. I decided to get to work on the peg head inlay. I had already cut the deer head shape out of abalone last week, so all I needed to do was route out the recess. That was fairly uneventful with one small exception where I bumped the dremel and accidentally cut outside the inlay pocket. Fortunately this was easily filled with ebony dust. Once the inlay was finished I decided that I wanted to do a white 'frame' around the peg head. I used black and maple binding strips for this. First I routed a thin channel along the edge of the peg head, then glued the strips around the perimeter. It really wasn't too terribly difficult to do, but the mitered corners were a pain in the neck to get together. It turned out pretty well, but if you look at the miters really closely, they aren't perfect. From any distance at all though they look great. All in all, I think it looks good and it ties in with the B/W/B perfling I did on the top.

This is what the back looks like with the two box elder inlays and the binding. If you click the picture to get the full sized one, you can see the upper inlay a little better. I scraped and sanded after this picture was taken.

This is the inlay scribe lines. I used the same method as I did with the fingerboard inlays to make the scribes.

I routed out the bulk of the inlay with a 1/16" downcut spiral bit.

I cleaned the rest out with a 1/32" bit, and an exacto knife. Note the small ding just above the nose of the deer head cut. That is where I slipped with the router.

The inlay glued in with ebony dust and CA glue.

After a bit of sanding, it looks great! That ebony is some great stuff, it hides the gaps really well.

The peg head after I routed the edges for the binding frame.

And here it is after I had all the bindings glued up.

Here is a close up of my miters. I clearly need some practice with them!

And the nut edge miters. They turned out a little nicer. I still have some cleanup to do but I won't do that until it is ready for finish sanding.
Wednesday, August 1, 2007
Back inlay....
I didn't have much time tonight to work on the SJ as we had another work night at the church. Lots of painting still needs to get done before the new youth leader moves in! Anyways I did get an hour or so out there so I decided to do the inlay 'repair' pieces on the back. I came up with a curved point design that I wanted to use that would first off cover up the little router mishap, but would also enhance the look of the guitar. I originally was going to use maple to do this but at the last minute I remembered that I had some scrap box elder from the rosette that would really look good. I layed out both pieces (top and bottom) using as much of the pink coloring as I could and cut them out. I routed out the channel to fit the pieces making sure that I only routed about 1/2 of the thickness of the back plates. On the neck end I could have routed the full depth of the pieces of box elder with no problem because the neck block was longer than the inlay piece, however the tail end piece was longer than the tail block length so I had to make sure I didn't route through the back plate. Once it was routed to fit, I glued and clamped them in place. Tomorrow I will sand them flush and get a good idea of how well my routing job was. I think I got a good tight fit, but it is hard to tell for sure because of the thickness of the inlay pieces. I think the color looks good and it matches the rosette so the back and top tie together a little bit.

This is the tail piece. Once it is dry and sanded to thickness, I will run the router with the binding bit along the edge to clean it up flush with the binding edge.

The neck end. This wood really has a nice 3-D look to it. It should look great under finish.

This is the tail piece. Once it is dry and sanded to thickness, I will run the router with the binding bit along the edge to clean it up flush with the binding edge.

The neck end. This wood really has a nice 3-D look to it. It should look great under finish.
Tuesday, July 31, 2007
Whoops, skipped a step............
Okay, so there I was happily driving down the road heading from one job site to another thinking about my guitar when it hit me square between the eyes. I skipped a step in my building process. You see, I glued in the top binding and perfling but had completely forgotten to install the tail graft. So, now I had to figure out how to get the graft in without messing up the binding at the top. When I got home I scurried up to the shop to check on it...... nope, no elves came in overnight and installed a graft.
First thing I did was to remove the tapes holding the binding in place, and then scrape the top to see how my binding job was. It turned out really good. No gaps at all. Okay, down to business. First I cut the curved shape that I used on my 000 out of curly maple. Then I traced it on the tail. I then very slowly and carefully routed out the side material for the graft all the way to just shy of the binding. I used a very sharp chisel to carve out the last little bit of wood next to the binding so I had the space for the graft all cleaned out. I glued the graft in place and let out a sigh of relief. All I need to do now is to sand it level and re-route the back binding channel at the tail end so the binding will butt up to the graft. Another problem solved!
I had a little bit of a exciting experience with my practice tonight. I have been practicing chords, transitions, and arpeggio's over and over and over again for the last several weeks. I pick a few simple songs but really it has been mostly just practicing the basics. My callouses are getting thick so clean fretting isn't much of a problem any more, and my transitions from chord to chord are becoming more automatic. I still have some hesitation between chords, but it is getting smaller every day. Well tonight I decided to start with the first set of lessons in my Fingerstyle book. It is the beginning of a simple fingerstyle song. I did as instructed, and I was stunned. I actually played something that sounded like music! I have been picking songs but those just don't sound like music if you know what I mean. This was different. It sounded like real music coming out of my guitar for the first time. I was really excited and that was just the big boost I needed that let me know that with a lot of practice and patience, I will be able to learn to play. Needless to say, I am really happy!

Here is the end graft channel. You can see that I cut right up to the top binding. That was a little bit of tedious work. One little slip and the binding would be ruined.

The tail graft glued and clamped in place.

Here is a view of the top perfling. It is a very simple design but I think it ties in with all of the simple features of the guitar.
Monday, July 30, 2007
Bindings glued in......
Ahhhh, it is nice having a free evening after work to spend some time in the shop working on the guitar. It seems I have been so busy lately that I haven't gotten much time on it and it feels like this building is crawling along. Well today I actually got a few good hours up there to spend some quality time on the SJ.
First I filled in the gaps around the fingerboard inlays with ebony dust and CA glue. Once that cured I sanded it all flat and went over it once with some 1500 grit to see how it will look. If I do say so myself, it really looks good. Yeah, if you look real close you can see where the fills are, but anything farther than about a foot away they are invisible. The ebony fingerboard has some light colored grain lines in it and I am still undecided whether or not to stain it black or not. Part of me wants all of the black parts to be, well black. The other part kind of likes the grain lines which makes it look natural instead of formal. I still have some time to think on it so I don't need to decide right now.
Anyways once that was done, I got the bindings out of the bender to get a look at them. Happily none of the broke and the bends look great. They fit the guitar body beautifully with very little effort to get the waist to fit nice and tight. I layed the maple and purpleheart together on the guitar top and decided I just didn't like the look of the purpleheart. It was too wide as a solid color, and the color itself just didn't look good. So I grabbed all the strips I had and started different combinations until I decided to go with plain old black/maple/black lines. Yeah, I know it isn't fancy but it ties in with everything else on the top. I set up the router table with the binding bit and then routed the top and back for the bindings and perflings. I had one very small mishap while doing this. On the back when the router bearing rolled along the neck joint area, I had forgotten that I had bumped the very top with my 3/4" router bit when I cleaned out the side wood around the mortise, and the binding bit followed that little bump. That made a bump in the cut right at the top. This will be more understandable when you look at the picture. Not a big deal but I will have to work with it. I have decided to repair it, I will do a curly maple inlay right at the top of the back center, and possibly at the bottom to match. I have a couple of design ideas and actually I am kind of glad this happened. It gives me the chance to do a little something different.
I went ahead and glued the top binding and perfling strips in. It was really uneventful, it just is something that I had to move fairly quickly with. With this being my 4th binding job, it definitely is getting easier and less scary. I know the first time I routed the bindings I was very nervous. This time it really was a non-issue. It was just another task that needed done.

The binding strips out of the bender. All four came out just fine, no cracks, no breaks.

The fingerboard after filling the inlay gaps.

The top binding and perfling channels.
 Here you can see the little oops I had. I am going to cut a decorative maple inlay on the back to fix the mistake. The ding is too big to fill without it being noticed.

The top binding and perflings glued and taped down.
First I filled in the gaps around the fingerboard inlays with ebony dust and CA glue. Once that cured I sanded it all flat and went over it once with some 1500 grit to see how it will look. If I do say so myself, it really looks good. Yeah, if you look real close you can see where the fills are, but anything farther than about a foot away they are invisible. The ebony fingerboard has some light colored grain lines in it and I am still undecided whether or not to stain it black or not. Part of me wants all of the black parts to be, well black. The other part kind of likes the grain lines which makes it look natural instead of formal. I still have some time to think on it so I don't need to decide right now.
Anyways once that was done, I got the bindings out of the bender to get a look at them. Happily none of the broke and the bends look great. They fit the guitar body beautifully with very little effort to get the waist to fit nice and tight. I layed the maple and purpleheart together on the guitar top and decided I just didn't like the look of the purpleheart. It was too wide as a solid color, and the color itself just didn't look good. So I grabbed all the strips I had and started different combinations until I decided to go with plain old black/maple/black lines. Yeah, I know it isn't fancy but it ties in with everything else on the top. I set up the router table with the binding bit and then routed the top and back for the bindings and perflings. I had one very small mishap while doing this. On the back when the router bearing rolled along the neck joint area, I had forgotten that I had bumped the very top with my 3/4" router bit when I cleaned out the side wood around the mortise, and the binding bit followed that little bump. That made a bump in the cut right at the top. This will be more understandable when you look at the picture. Not a big deal but I will have to work with it. I have decided to repair it, I will do a curly maple inlay right at the top of the back center, and possibly at the bottom to match. I have a couple of design ideas and actually I am kind of glad this happened. It gives me the chance to do a little something different.
I went ahead and glued the top binding and perfling strips in. It was really uneventful, it just is something that I had to move fairly quickly with. With this being my 4th binding job, it definitely is getting easier and less scary. I know the first time I routed the bindings I was very nervous. This time it really was a non-issue. It was just another task that needed done.

The binding strips out of the bender. All four came out just fine, no cracks, no breaks.

The fingerboard after filling the inlay gaps.

The top binding and perfling channels.
 Here you can see the little oops I had. I am going to cut a decorative maple inlay on the back to fix the mistake. The ding is too big to fill without it being noticed.
The top binding and perflings glued and taped down.
Saturday, July 28, 2007
Some fingerboard attention....
Today was a busy day. We had a big work day at our church to get a house for our new youth minister ready for him to move in. Lots of painting, cleaning, and misc. work to be done. Because of that, I didn't get a lot of time to work on the guitar, however I did some of the inlay work. First I needed to narrow the fingerboard by .2", .1" on each side to accommodate the binding. I used my router jig to narrow the board on each side. After that was done, I noticed that I had a bit of a dip in the fingerboard down around the 15 - 20th fret area. I spent some time with a straight edge with sandpaper on it to get it all leveled out. It still will need some work, but I will do that once I have it glued to the neck. I have decided to try fretting after the fretboard has been installed. This will allow me to get the fingerboard leveled better then I have been able to do previously. I am a little nervous about doing it this way, but a lot of builders go this way for the exact reason I mentioned.
I then decided to work on the markers. I am using some curved shapes I cut out of abalone so it isn't as simple as drilling holes for dots. I made copies of the pieces on my copier, taped them to the fingerboard and cut them out to make scribe lines. I then routed them out using my dremel and router base. It went pretty well. The relief cuts aren't perfect by any means, but I am getting better. Since the fingerboard is ebony (I picked ebony for this exact reason!) it should be easy to fill any gaps almost invisibly.
My practicing is getting better. I have been drilling myself working chords and trying to transition between chords smoothly. I really don't have any problems fretting the chords cleanly, but I still have to 'think' about the chords which slows me down. When I say think, I don't mean I have to try and remember the chord, I mean I have to purposely set my fingers instead of having them automatically find the strings. I have been assured that with practice, this muscle memory WILL come, it just takes time. It is slow going, but I am seeing progress. So far the chords I have memorized and can switch between fairly smoothly are Am, A, A7, B7, C, C7, Dm, D, D7, Em, E, E7, F, G, and G7. I am just starting to work with a finger style book as that is how I want to play. Like I said, it is slow going, but I feel progress happening. It is a lot of fun.

Whoops, I forgot to mention that I bent the bindings and perfling strips. I taped them all together and wrapped them in kraft paper all spritzed with water.

I put them in the bender and it went smoothly. I checked them and there were no cracks or breaks.

This is how I narrow the fingerboard to the exact size of the bindings. I use my stewmac binding bit with the bearing on the bottom. I line the edge of the fingerboard flush to the jig. As you can see the cutter edge overhangs the jig by the exact amount of the binding. Again, this is a ton faster and cleaner than using a shooting board to do the job. It is dead on accurate too.

This is what it looks like after the cut. You can see that the edge of the fingerboard is now .1" inside of the edge of the jig....

...and that is exactly how thick the bindings are! Once one side is done, I just flip it and do the other edge. Simple as pie.

The fingerboard sitting on the neck blank.

I marked the marker locations. Notice the single and double lines on the top of the board. Those are there so I can remember which space gets single and which space gets double markers. I have a terrible memory for things like that!

These are the copies of the markers taped to the board. I cut them out and that gave me scribe lines. I know they look crooked, but the actual marker pictures are straight, it is just the paper that isn't cut straight to the image. It really causes an optical illusion!

These are what the scribe marks look like after cutting out the paper images.

I routed out the inlay pockets and tack glued the pieces in. I still need to fill the gaps with ebony dust and glue but so far I am happy with the look.
Wednesday, July 25, 2007
Binding indecision and some inlay work....
Okay, so I went to my local Woodcraft to see if they had some unusual hardwood boards that I might be able to buy and cut some of my own bindings. Well, unfortunately they really didn't have much of a selection. I ended up not getting anything there, but I did go to one of the big box stores to get some other things and picked up a piece of Oak and clear maple that had a reddish color to it. I decided it was inexpensive so I wasn't out much if I didn't get anything that I like out of it. I ripped them down to binding sizes and now I need to decide what to use. I have curly maple, clear reddish colored maple, oak, bloodwood, and purpleheart to choose from. I am leaning towards the curly maple as none of the others really are jumping out at me. If I do use the maple, I have decided that I will rip .1"x.15" strips of purple heart to use as perfling. I think it will tie the top in with the sides a bit. I have a couple of .1"x.1" strips that I held in place and it looks pretty nice so I think that is what I will go with. Either that or black strips. Huh, too many decisions! I never had this problem before, I just go with what I have and am happy. For some reason I am really want to make things tie together with this one.
After that I decided to start cutting my inlay pieces. I am using the same deer head on the peg head, and am using curved pieces for fret markers. I am up in the air on whether to do my initial on the heel or not for this one. I kind of like the idea of an initial on the heel, but it would be nice to be able to put the initial of the eventual owner on it instead of mine. I will have to think about it.

Here are my binding choices. From top to bottom: Curly maple, Bloodwood, Flat maple, Red Oak, and Purpleheart.

These are the inlay pieces ready to be cut out.

Here I am cutting the deer head with a jewelers saw.

The deer head cut out. Note the size compared to a pick. It is pretty small and quite delicate!
Subscribe to:
Posts (Atom)


