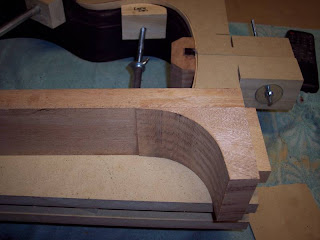
Once that was done, it was time to sand the top and back edges of the sides to the 15' and 30' radius' that I wanted. First I sanded the top edge to 30' using a radius dish. Once that was done I then could measure the depth of the sides, transfer a line around it and cut it to the correct size.
The method I use to do this is something I picked up from the kit guitar builders website. Essentially you make a cardboard grid with lines spaced 2" apart to set the sides on. Then you mark the plans in 2" increments, and then measure those locations for body depth. Those measurements are then transferred to the body using the cardboard grid, a square and a ruler. Tape is run around the perimeter of the body to 'connect the dots' so to speak. This gives you a line all around the body that matches the plans. This method works great but has one significant flaw if you are trying to build a radiused dome in the back and top. The side drawings of the guitar never actually represent the correct dimensions at the waist. This is because the waist, as it goes in towards the center of the body will need to be wider because the dome is deeper at that point. My first try at using this method is where I found this flaw. I rough cut the sides to the line but when I put it in the sanding dish, I realized that the waist was cut too deeply. I was able to compensate by sanding the neck and tail blocks down until the waist touched but this made the guitar a bit thinner than it should have been. When I built my OOO, I used the same method, however I left the waist a bit thicker to compensate for this. It worked great so I did the same thing here. This might not make sense to read, but I am posting pictures that should help you visualize what I am talking about.
Anyways, I taped the line around the body and rough cut it using my microplane and cordless drill. I then changed sanding dishes and then started dancing "The Twist" ! It must look funny watching me swivel the sides back and forth sanding them down. It's good exercise I must say!
So I now have a neck blank ready for carving, and sides ready for kerfing. Next up will be kerfing and then I will start working on the soundboard and rosette. The OOO is also ready for final sanding so I might get started on that this week if time permits.

This is the tenoning jig I use for this kind of cut. It holds the neck securely and square. It make it a very safe operation.

Then I used a grid board to transfer these measurements on the body. Then I wrapped tape around the body to connect the dots. The top edge of the tape is the cutting depth.

Here is the body after I rough cut close to the line using a microplane. You will notice I kept the cut quite high of the line at the waist going down into the lower bout. I told you the place was going to look like Barney exploded during this build!

This picture really shows what I was trying to explain above. This has been sanded to the 15' radius and you will notice that the sides don't even come close to the tape line. That is because the dome is deeper the closer to the center you get. If I had rough cut down to the tape line, I would have to remove a lot of material at the neck and tail to get the waist to the correct radius again.


No comments:
Post a Comment