Tonight after work, I spent just a little bit of time working on the bridge. I decided I wanted a double layer effect on the bridge so I flattened the two wings out and beveled the trailing edge, and rounded the leading edge. This kind of gave the pin and saddle section a curved shape. Then I sanded and polished it with my
micromesh pads. I am really happy with it. Now I have to drill the pin holes and route out the saddle slot. I have the tuners, a 3/32"
downcut bit, and some lacquer on order from
Stewmac so until that shows up, I won't be doing the saddle slot. I have my
LMI order all ready to go, I just need to make the order which will probably happen this weekend. I measured several thicknesses against a martin style bridge so this bridge has the same critical dimensions. Also, this bridge only weighs 2 grams more than the martin bridge, and that is before drilling out the peg holes and routing the saddle slot. I am sure once that is done, this bridge will be equal to or slightly lighter than the premade one I have.

Just a few pictures of the finished bridge.
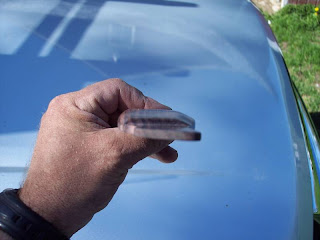
Note the rounded front and tapered rear edges.

The actual profile is pretty similar to the Martin bridge.

Here you can see how the rear taper makes the top look curved. I really like the look.


No comments:
Post a Comment